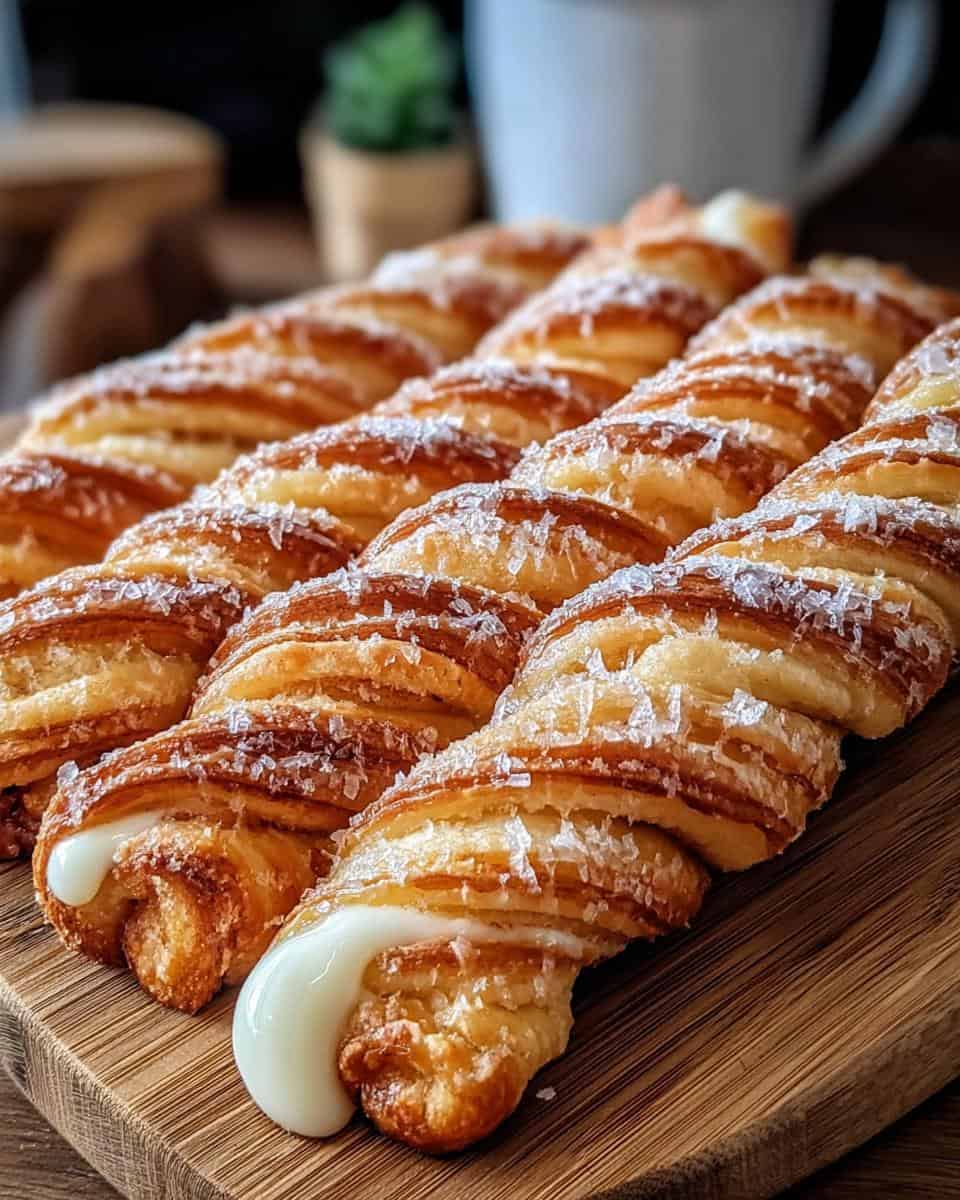

There’s just something about a homemade treat, isn’t there? The smell wafting through the house, the happy faces when you bring out a platter… it’s pure magic. And trust me, these Homemade Maple Donut Bars? They’re like a shortcut to that magic! They’re seriously easy to whip up, and that maple flavor? Forget about it! So much better than anything you’ll find at the store.
I’ll never forget the first time I tried making donuts. Oh man, what a disaster! They were flat, greasy, and tasted vaguely of sadness. But hey, we all start somewhere, right? Years of baking later (and a *lot* of practice!), I’ve finally cracked the code. And I’m so excited to share this recipe with you. Prepare to be amazed at how simple and utterly delicious these bars are. Seriously, you’ll be hooked!
Why You’ll Love These Homemade Maple Donut Bars
Okay, so why *these* donut bars? Well, let me tell you! They’re:
- Easy to make: Seriously, if I can do it, you can *definitely* do it!
- Delicious maple flavor: That glaze is the real star. It’s sweet, rich, and perfectly maple-y.
- Perfect for breakfast or dessert: I mean, who says you can’t have donuts for breakfast? Or dessert? Or both?!
- An impressive treat to share: Bring these to a brunch or potluck, and you’ll be the hero, I promise!
- Way better than store-bought: No contest. Freshly fried and glazed? You just can’t beat it.
Simple and Satisfying Homemade Maple Donut Bars
Honestly, my favorite part is how easy these are. You get that “I made donuts from scratch!” feeling without spending all day in the kitchen. Plus, there’s nothing quite like that first bite of a warm, fluffy donut you made yourself. It’s pure baking bliss!

Ingredients for Your Homemade Maple Donut Bars
Alright, let’s talk ingredients! Don’t worry, you probably have most of this stuff in your pantry already. Here’s what you’ll need for these amazing Homemade Maple Donut Bars:
- 1/2 cup warm water (110°F) – Gotta get that yeast happy!
- 3/4 cup warm milk – Whole milk works best, but whatever you have is fine.
- 2 tsp dry active yeast – Check the expiration date, okay?
- 1/2 cup + 1 Tbsp granulated sugar – For sweetness, of course!
- 1/2 tsp salt – Balances out the sweet. Trust me.
- 5 large eggs – Adds richness and structure.
- 1/2 cup unsalted butter, softened – Make sure it’s *softened*, not melted!
- 5 1/2 cups all-purpose flour – The backbone of our donut bars.
- 1/4 cup unsalted butter – More butter for the glaze!
- 1/2 cup packed brown sugar – Gives the glaze that yummy caramel-y flavor.
- 3 Tbsp milk – Just a splash for the glaze.
- 1 Tbsp corn syrup – Keeps the glaze nice and smooth.
- 2 tsp maple extract – Don’t skimp on this! It’s what makes them maple-y!
- 2 cups powdered sugar – For that perfect glaze consistency.
- Corn or vegetable oil, for frying – You’ll need enough for about 2 inches in your pot.
How to Make Homemade Maple Donut Bars: Step-by-Step Instructions
Okay, here we go! This might seem like a lot of steps, but trust me, it’s totally doable. Just take it one step at a time, and you’ll be enjoying warm, delicious Homemade Maple Donut Bars in no time!
Preparing the Dough for Homemade Maple Donut Bars
First, let’s get that yeast party started! Combine your warm water, warm milk, a tablespoon of sugar, and the yeast in a bowl. Let it sit for about 10 minutes – it should get nice and foamy. While that’s happening, mix your flour, salt, and remaining sugar in your stand mixer. Then, pour in the yeast mixture and add those eggs. Mix it all up, then add your softened butter. Knead that dough until it’s smooth and elastic – about 8 minutes. Now, pop the dough into a greased bowl, cover it, and let it rise in a warm place for about an hour, or until it’s doubled in size. A warm oven is perfect!
Frying Your Homemade Maple Donut Bars to Perfection
Alright, punch that risen dough down! Time to roll it out on a floured surface to about 3/4-inch thickness. Cut out those donut bars (about 12), and place them on a floured baking sheet. Let them rise again for about 30 minutes – don’t skip this! Now, heat up about 2 inches of oil in a pot to between 360–375°F. Carefully fry those donut bars for about 2 minutes per side, until they’re golden brown. Transfer them to some paper towels to cool completely. Careful, that oil is HOT!

Creating the Perfect Maple Glaze for Your Homemade Donut Bars
While those bars are cooling, let’s whip up that amazing maple glaze! Melt the butter in a saucepan, then stir in the brown sugar, milk, and corn syrup. Simmer it over medium heat for a minute or two. Take it off the heat and stir in that maple extract (the good stuff!) and powdered sugar until it’s all smooth and dreamy. If it’s too thick, add a tiny bit more milk. If it’s too thin, add a bit more powdered sugar. You want it pourable, but not watery!
Glazing and Finishing Your Homemade Maple Donut Bars
Okay, the moment we’ve all been waiting for! Once those donut bars are completely cool (I know, it’s hard to wait!), dip them into that luscious maple glaze. Let the excess drip off, and then place them on a cooling rack to set. Now, if you’re feeling fancy (and you should be!), sprinkle them with some sprinkles, chopped nuts, or whatever your heart desires! Then, just try to resist eating them all at once. Good luck with that!
Tips for the Best Homemade Maple Donut Bars
Want your Homemade Maple Donut Bars to be *amazing*? Of course, you do! Here are a few little secrets I’ve learned along the way:
- Don’t overmix the dough: Seriously, just mix until everything’s combined. Overmixing leads to tough donuts, and nobody wants that!
- Use fresh yeast: Expired yeast = flat donuts. Check that date!
- Maintain a consistent oil temperature: This is key for even cooking. Too hot, and they’ll burn on the outside. Too cold, and they’ll be greasy. A candy thermometer is your friend here!
- Cool the donuts completely before glazing: If they’re still warm, the glaze will just melt right off. Patience, my friend!
Trust me, these little tips will make a *huge* difference. Happy baking!
Variations on Your Homemade Maple Donut Bars Recipe
Okay, so you’ve nailed the basic Homemade Maple Donut Bars recipe? Awesome! Now, let’s get a little crazy, shall we? This recipe is seriously a blank canvas for all sorts of deliciousness. Here are a few ideas to get you started:
- Different extracts: Swap out the maple extract for vanilla or almond extract for a completely different vibe. Almond is my personal fave!
- Add spices to the dough: A little cinnamon or nutmeg in the dough adds a warm, cozy flavor. Perfect for fall!
- Use different toppings: Forget sprinkles! Try chopped nuts, shredded coconut, or even crushed-up cookies. Sky’s the limit!
- Create a chocolate glaze: Oh yeah, you heard me. Just add some cocoa powder to the maple glaze for a chocolatey twist. Mind. Blown.
Seriously, don’t be afraid to experiment! Baking is all about having fun, so go wild and create your own signature donut bar masterpiece!
Frequently Asked Questions About Homemade Maple Donut Bars
Got questions about making these amazing Homemade Maple Donut Bars? I got you! Here are some of the most common questions I get asked, plus my super-helpful answers:
Can I bake these Homemade Maple Donut Bars instead of frying?
Okay, so frying is *definitely* the traditional way to go (and, in my opinion, the tastiest!), but yeah, you *can* bake ’em if you’re trying to be a little healthier. Just bake them at 375°F for about 10-12 minutes, or until they’re golden brown. Keep a close eye on them, though – baking times can vary! They won’t be quite as fluffy as the fried ones, but they’ll still be delicious.
How do I store leftover Homemade Maple Donut Bars?
If you happen to have any leftovers (which, let’s be honest, is a big “if”!), just pop them in an airtight container at room temperature. They’ll stay good for up to 2 days. But trust me, they’re best enjoyed fresh!
Can I freeze the dough for Homemade Maple Donut Bars?
Yep! If you want to get a head start, you can totally freeze the dough. Just let it go through the first rise, then wrap it up tightly in plastic wrap and pop it in the freezer. When you’re ready to make donuts, thaw it overnight in the fridge. Easy peasy!
What is the best oil to use for frying Homemade Maple Donut Bars?
For frying, you want an oil with a high smoke point. Vegetable or canola oil are both great choices. Peanut oil works too, if you’re not allergic! Just make sure you have enough to fill your pot to about 2 inches deep. And please, be careful when you’re working with hot oil!
A Disclaimer on Nutritional Information for Homemade Maple Donut Bars
Okay, so here’s the deal: I’m not a nutritionist! The nutritional info you might see floating around? It’s just an estimate. It can vary *a lot* depending on the exact ingredients and brands you use. So, take it with a grain of salt, okay?
Enjoy Your Delicious Homemade Maple Donut Bars!
Alright, that’s it! You’re all set to make the most amazing Homemade Maple Donut Bars ever! Seriously, give this recipe a try – you won’t regret it. And hey, if you do make them, be sure to leave a comment and let me know how they turned out! Oh, and don’t forget to rate the recipe and share your donut creations on social media! Happy baking, friends!
Print
Homemade Maple Donut Bars: 12 Irresistible Bites
- Prep Time: 30 minutes
- Cook Time: 25 minutes
- Total Time: 3 hours 25 minutes
- Yield: 12 donut bars 1x
- Category: Dessert
- Method: Frying
- Cuisine: American
- Diet: Vegetarian
Description
Make delicious homemade maple donut bars. These bars are soft, fluffy, and topped with a rich maple glaze.
Ingredients
- 1/2 cup warm water (110°F)
- 3/4 cup warm milk
- 2 tsp dry active yeast
- 1/2 cup + 1 Tbsp granulated sugar
- 1/2 tsp salt
- 5 large eggs
- 1/2 cup unsalted butter, softened
- 5 1/2 cups all-purpose flour
- 1/4 cup unsalted butter
- 1/2 cup brown sugar
- 3 Tbsp milk
- 1 Tbsp corn syrup
- 2 tsp maple extract
- 2 cups powdered sugar
- Corn or vegetable oil, for frying
Instructions
- Froth the Yeast: Combine warm water, warm milk, 1 Tbsp sugar, and yeast. Let sit for 10 minutes until foamy.
- Mix the Dough: In a stand mixer, combine flour, salt, sugar, and the yeast mixture. Add eggs and mix. Add softened butter and mix until smooth and elastic (about 8 minutes).
- Let the Dough Rise: Transfer dough to a greased bowl. Cover and let rise in a warm place for 1 hour, or until doubled.
- Punch Down and Proof Again: Punch down the dough, reshape, and let rise again for 1 hour.
- Roll, Cut, and Proof Again: Roll dough on a floured surface to 3/4-inch thickness. Cut into 12 donut bars. Place on a floured baking sheet and let rise for 30 minutes.
- Fry the Donuts: Heat 2 inches of oil to 360–375°F. Fry donuts for 2 minutes per side until golden brown. Transfer to paper towels to cool completely.
- Make the Maple Glaze: Melt butter in a saucepan. Add brown sugar, milk, and corn syrup. Simmer over medium heat. Remove from heat and stir in maple extract and powdered sugar until smooth.
- Glaze the Donuts: Dip cooled donuts into the glaze and place them on a cooling rack to set.
Notes
- Ensure the oil temperature is consistent for even cooking.
- Cool the donuts completely before glazing for best results.
Nutrition
- Serving Size: 1 donut bar
- Calories: 450
- Sugar: 35g
- Sodium: 200mg
- Fat: 25g
- Saturated Fat: 15g
- Unsaturated Fat: 8g
- Trans Fat: 1g
- Carbohydrates: 55g
- Fiber: 2g
- Protein: 6g
- Cholesterol: 80mg